Quick Answer
To reduce your Snowflake spend, start with three high-impact changes: set warehouse auto-suspend to 60 seconds, right-size warehouses to match actual workload needs, and separate warehouses by workload type for cost attribution. Snowflake credits cost ~$2–$4 each depending on edition, and compute accounts for over 70% of most bills. Targeting compute waste first delivers the fastest savings without affecting query performance.
Snowflake cost optimization is the practice of reducing compute, storage, and cloud services spend in Snowflake without sacrificing query performance or data availability. With Snowflake’s consumption-based pricing, where the Snowflake cost per credit ranges from ~$2 to ~$4 depending on your edition, even small configuration changes deliver measurable savings. This guide covers 12 strategies, from warehouse right-sizing to query tuning, that help engineering and FinOps teams bring Snowflake costs under control.
How Does Snowflake Pricing Work?
Understanding the Snowflake cost model is the first step toward reducing spend. Snowflake bills across three layers: compute, storage, and cloud services. Compute normally accounts for more than 70% of the total bill and is where most waste lives.
Snowflake measures compute in credits. The dollar cost per credit depends on your edition and payment terms:
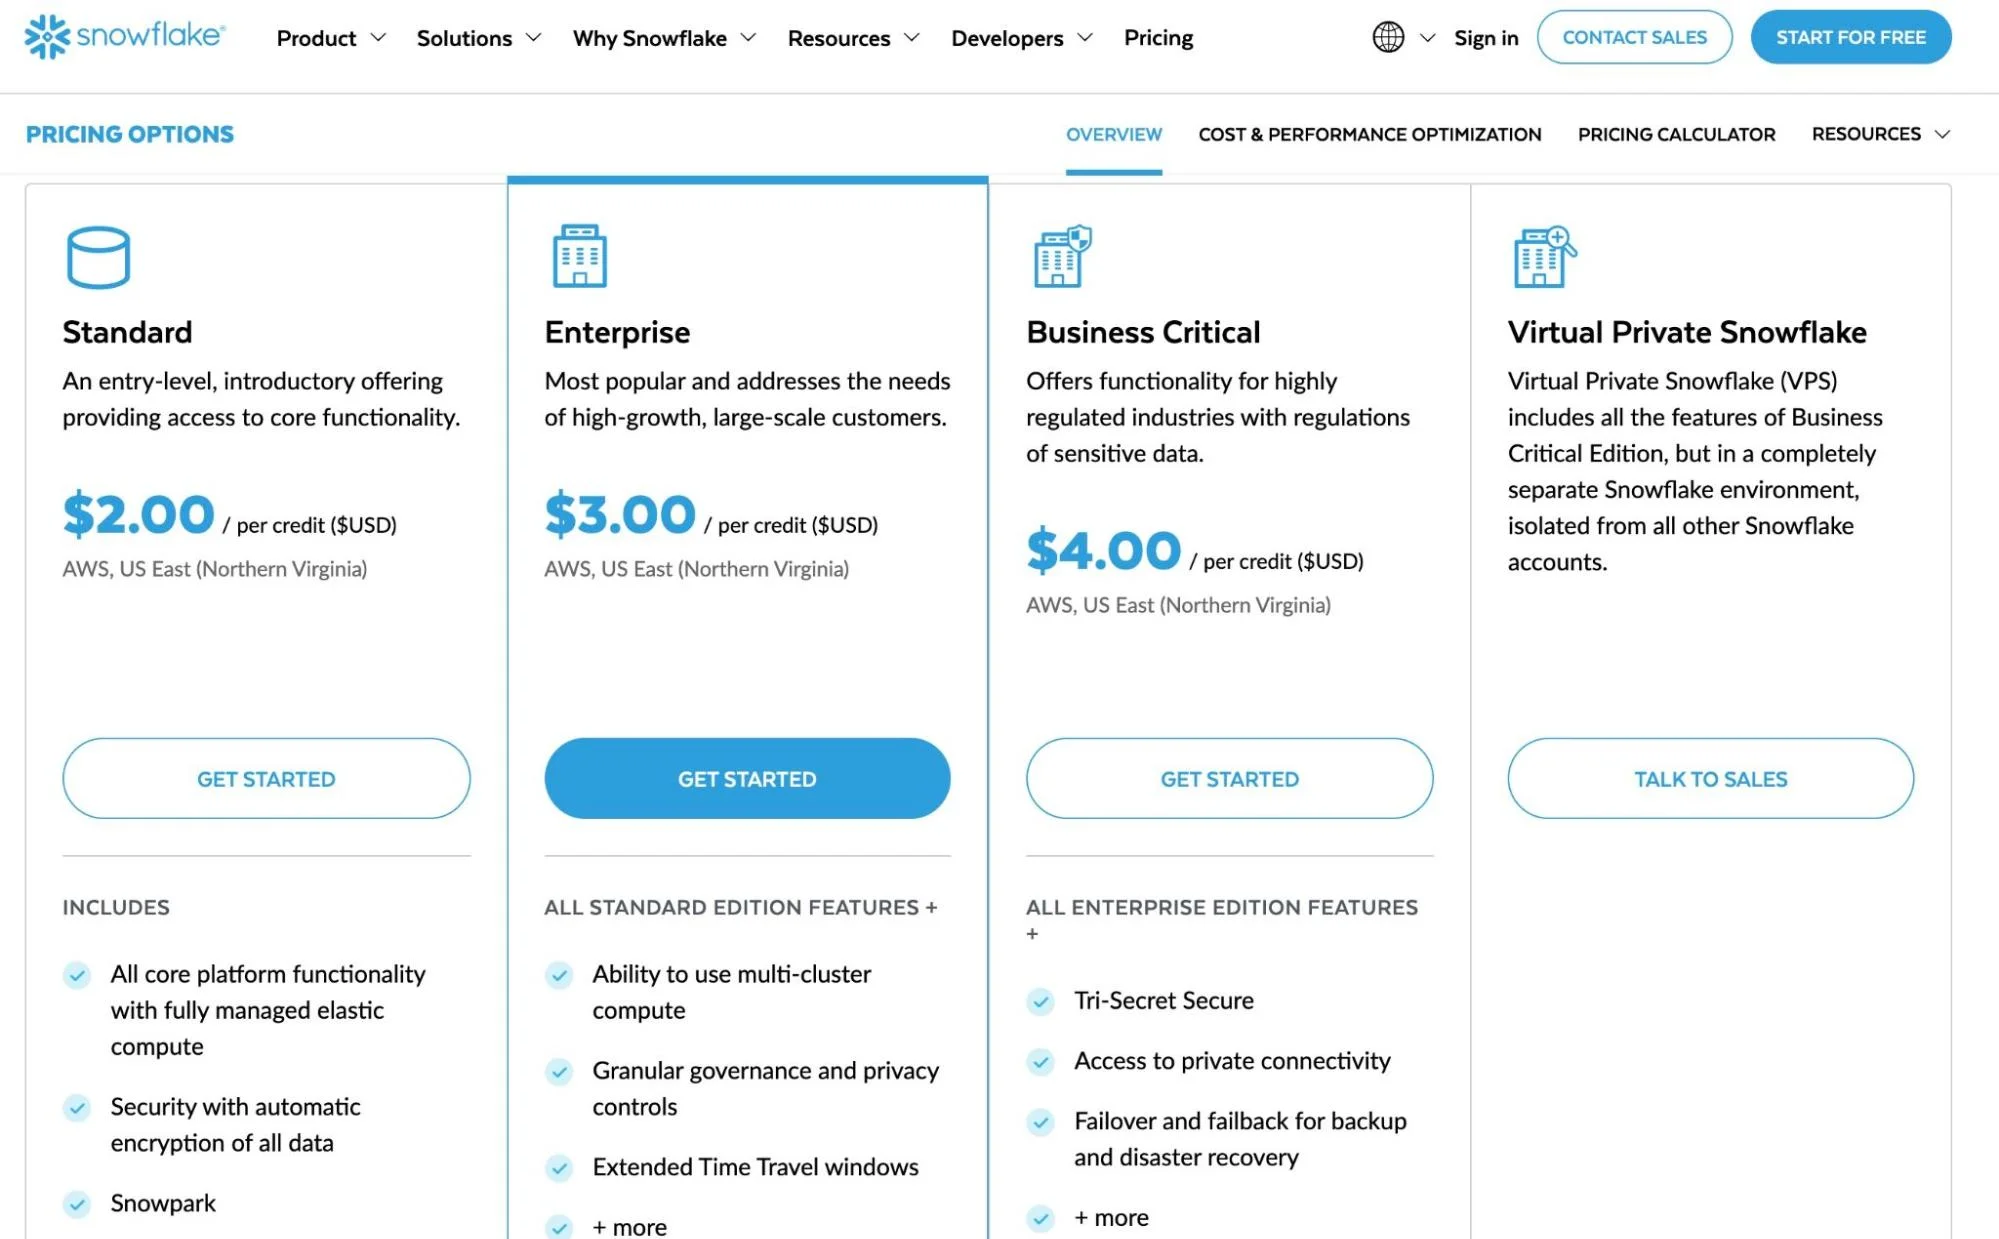
Source: Snowflake. Capacity commitment contracts typically reduce per-credit pricing by 15–40%.
Warehouse sizes follow a T-shirt model. Each size doubles in compute power and credit consumption:
|
Warehouse size |
Credits per hour |
Estimated enterprise cost/hour |
|
X-Small |
1 |
~$3 |
|
Small |
2 |
~$6 |
|
Medium |
4 |
~$12 |
|
Large |
8 |
~$24 |
|
X-Large |
16 |
~$48 |
|
2X-Large |
32 |
~$96 |
Note: Estimates assume ~$3 per credit for Snowflake Enterprise edition. Actual pricing varies by region, cloud provider, edition, and negotiated contract rates.
How Snowflake Costs Compare To Redshift And BigQuery
|
Dimension |
Snowflake |
Amazon Redshift |
Google BigQuery |
|
Billing model |
Per-second, credit-based |
Hourly (provisioned) or per-RPU-hour (serverless) |
Per-TB scanned (on-demand) or per-slot-hour (capacity) |
|
Compute/storage separation |
Yes — fully separated |
Yes (RA3 nodes); no (DC2 nodes) |
Yes — fully separated |
|
Best fit workload |
Bursty, sporadic analytics |
Steady-state, high-concurrency |
Ad hoc analytics, low-admin teams |
|
Auto-suspend |
Yes (configurable, min 60s) |
No (provisioned); auto-pause for serverless |
N/A — compute spins up per query |
|
Minimum cost |
~$2/credit (Standard on-demand) |
~$0.36/hour (dc2.large) |
$6.25/TB scanned (on-demand) |
|
Cost risk |
Idle warehouses, oversized compute |
Over-provisioned clusters |
Uncontrolled query scanning |
Note: Pricing as of 2026. Actual costs vary by region, contract terms, and usage patterns. See Snowflake vs. AWS vs. Azure for a detailed breakdown.
Storage is billed separately at approximately $23 per compressed terabyte per month on AWS US regions. Snowflake automatically compresses data, usually by 3x to 5x, so storage costs are usually a smaller portion of the total bill.
Cloud services, the overhead for metadata management, authentication, and query optimization, are included free up to 10% of your daily warehouse compute. Beyond that threshold, additional cloud services credits are billed.
So the most common question among Snowflake users:
Is Snowflake expensive? Not inherently. Snowflake’s per-second billing and separated compute/storage can be cost-effective for bursty, analytical workloads. But without active Snowflake cost management, idle warehouses, oversized compute, and unoptimized queries inflate bills quickly. For a detailed breakdown of Snowflake’s pricing tiers and payment options, see our full Snowflake pricing guide.
Related: Data Warehouse Vs. Data Lake (Vs. Data Mart): A Full Breakdown
Report
Finance needs to prove AI’s return: CloudZero report
260 senior finance leaders (more than half CFOs) told us why the speed of seeing AI spend, not the size of it, separates who pulls ahead on AI from who gets burned.
Where Do Snowflake Compute Costs Add Up?
Most runaway bills share a few patterns. Recognizing them helps you target the highest-impact strategies first.
- Oversized warehouses running longer than needed. A Large warehouse (8 credits/hour) left running 24/7 on Enterprise edition consumes 5,952 credits per month — over $17,800. Reducing its active runtime to 10 hours per day cuts that cost by more than 58%.
- Auto-suspend misconfiguration. Snowflake’s default auto-suspend interval keeps warehouses running after queries finish. If your workloads are sporadic, those idle minutes compound every day.
- Redundant or unoptimized queries. Snowflake charges per second of compute, with a 60-second minimum each time a warehouse starts. Queries that scan full tables, skip caching, or run more frequently than needed inflate credit consumption on every execution.
- Unused data accumulation. Time Travel retention (up to 90 days on Enterprise) and Fail-safe storage (seven additional days) both incur ongoing storage costs. Tables that no one queries still cost money to retain.
Before You Start: What You Need For Snowflake Cost Optimization
These strategies assume you have the following in place. If any are missing, start there:
|
Prerequisite |
Why it matters |
|
ACCOUNTADMIN or SYSADMIN role access |
Most cost optimization SQL (resource monitors, warehouse config) requires elevated privileges |
|
ACCOUNT_USAGE schema access |
WAREHOUSE_METERING_HISTORY, QUERY_HISTORY, and STORAGE_USAGE views are the data source for every recommendation below |
|
Snowflake Enterprise edition or higher |
Multi-cluster warehouses, 90-day Time Travel, and materialized views require Enterprise. Standard edition users can still implement strategies 1–6 and 8–10 |
|
A cost attribution model |
Know which teams, pipelines, or products should own which warehouses. Without this, optimization is guesswork — you’re cutting costs you can’t attribute |
How to reduce Snowflake compute costs
Snowflake compute costs are the biggest optimization target. These strategies address the top drivers: warehouse sizing, scaling, and idle time.
1. Right-size your warehouses
Bigger warehouses run queries faster but do not always cost less. A query that takes 60 seconds on an X-Large warehouse (16 credits/hour) costs roughly the same credits as a query that takes 120 seconds on a Large warehouse (8 credits/hour), about 0.27 credits either way.
The difference is wall-clock time, not spend.
Test your most frequent queries across warehouse sizes to find the break-even point. In many cases, a Medium warehouse (4 credits/hour) handles standard analytical workloads without the overhead of larger configurations. For a broader comparison of data warehouse costs, see our Snowflake vs. AWS vs. Azure guide.
2. Use multiple warehouses for different workloads
Running all queries through a single warehouse makes cost attribution impossible. You see one lump sum and have no way to identify which team, pipeline, or workload is driving spend.
Create dedicated warehouses for distinct workload types: ETL/ELT ingestion, BI dashboards, ad hoc analysis, and data science. This separation gives each workload the right-sized compute and makes costs visible at the workload level — a foundation for chargeback and showback models.
3. Set auto-suspend to 60 seconds
Auto-suspend controls how long a warehouse stays running after its last query completes.
Setting it to 60 seconds is a standard Snowflake cost optimization best practice:
ALTER WAREHOUSE my_warehouse SET AUTO_SUSPEND = 60;
Since Snowflake bills per second with a 60-second minimum on each startup, the cost of resuming a suspended warehouse is minimal compared to minutes of idle runtime.
4. Configure scaling policies and minimum clusters
Enable auto-resume so warehouses restart automatically when queries arrive:
ALTER WAREHOUSE my_warehouse SET AUTO_RESUME = TRUE;
For Enterprise edition users, multi-cluster warehouses scale horizontally during peak demand. Set the minimum cluster count to one and the maximum based on concurrency needs:
ALTER WAREHOUSE my_warehouse SET MIN_CLUSTER_COUNT = 1 MAX_CLUSTER_COUNT = 3;
How Do You Calculate Snowflake Cost Per Query?
Snowflake does not display a per-query price natively. To estimate Snowflake cost per query, you need three numbers: the warehouse size (credits per hour), execution time (in seconds), and your credit rate.
The formula:
Query cost = (credits per hour / 3,600) x execution time in seconds x cost per credit
Here’s an example:
A 45-second query on a Medium warehouse (4 credits/hour) at $3/credit (Enterprise):
(4 / 3,600) x 45 x $3 = $0.15
The same query on a Large warehouse (8 credits/hour) finishing in 25 seconds:
(8 / 3,600) x 25 x $3 = $0.17
The larger warehouse finished faster but cost slightly more. This is why A/B testing warehouse sizes against your actual queries matters, speed and cost do not always move in the same direction.
Pull execution times from SNOWFLAKE.ACCOUNT_USAGE.QUERY_HISTORY, which logs every query with its warehouse, runtime, and bytes scanned. Cross-reference with your credit rate to build a cost-per-query report.
Snowflake also offers an official Snowflake cost calculator to estimate compute and storage costs by warehouse size and edition. It is useful for forecasting, though it cannot predict optimal sizing for specific workloads.
How to reduce Snowflake cost per query
After warehouse sizing, query efficiency is the next lever. Every query that scans more data or runs longer than necessary consumes credits that could have been avoided.
1. Use result caching
Snowflake caches query results for 24 hours. If the underlying data has not changed, identical queries return cached results at zero compute cost. This is valuable for BI dashboards where multiple users run the same reports.
Avoid appending CURRENT_TIMESTAMP() or other dynamic functions to queries unless you need real-time results. These functions invalidate the cache and force a full recompute.
2. Enable query timeouts
Runaway queries such as stuck in loops or scanning unexpectedly large datasets can consume hours of compute. Set a statement-level timeout to cap execution time:
ALTER WAREHOUSE my_warehouse SET STATEMENT_TIMEOUT_IN_SECONDS = 1800;
This terminates any query running longer than 30 minutes. Adjust based on your longest expected workloads.
3. Reduce query frequency with materialized views
Materialized views (available on Enterprise and above) precompute and store query results.
Instead of recalculating expensive aggregations on every run, Snowflake returns the stored result and refreshes it incrementally as base data changes.
The trade-off: materialized views incur a serverless compute cost at a 2x credit multiplier for maintenance. For queries that run dozens of times daily, the net savings typically outweigh the maintenance cost.
4. Embed metadata for cost attribution
Native Snowflake cost monitoring breaks costs down by warehouse, but that is not granular enough to answer “what does this pipeline cost?” or “which team is consuming the most credits?”
Embedding metadata such as team name, pipeline ID, or feature name into query comments creates the attribution layer:
/* {“team”: “data-eng”, “pipeline”: “daily_etl”, “feature”: “user_activity”} */
SELECT …
Parsing these comments with a cost intelligence platform turns warehouse-level spend into cost-per-query, cost-per-pipeline, and cost-per-team visibility. More on this in the CloudZero section below.
How Can You Reduce Snowflake Storage Costs?
Storage is a smaller share of the bill, but it compounds over time as data accumulates and Time Travel retention adds overhead.
Here are several practical, proven tips on how to reduce Snowflake storage costs:
1. Drop unused tables
Query SNOWFLAKE.ACCOUNT_USAGE.ACCESS_HISTORY to identify tables with no recent reads. Tables not accessed in 90+ days are candidates for removal or archival to cheaper cold storage. For a broader look at managing your environment, see our guide to Snowflake tools for monitoring storage and usage.
2. Use transient tables for staging data
Transient tables skip Fail-safe storage and support only 0 or 1 day of Time Travel, making them ideal for staging and intermediate processing:
CREATE TRANSIENT TABLE staging_data (…);
3. Tune Time Travel retention
Enterprise edition includes up to 90 days of Time Travel, but not every table needs the full window:
ALTER TABLE my_table SET DATA_RETENTION_TIME_IN_DAYS = 1;
Reserve longer retention for production fact tables where accidental data loss would be costly. For staging or temp tables, one day is sufficient. See more: Snowflake Time Travel & Fail-safe
How Do You Monitor Snowflake Costs In Real Time?
Optimization is not a one-time project. Without ongoing monitoring, new workloads and configuration drift push costs back up.
1. Set up resource monitors
Snowflake’s native resource monitors track credit consumption and trigger actions at configurable thresholds:
CREATE RESOURCE MONITOR monthly_limit
WITH CREDIT_QUOTA = 5000
FREQUENCY = MONTHLY
START_TIMESTAMP = IMMEDIATELY
TRIGGERS
ON 75 PERCENT DO NOTIFY
ON 90 PERCENT DO SUSPEND
ON 100 PERCENT DO SUSPEND_IMMEDIATE;
Assign resource monitors to specific warehouses for granular control. Configure email notifications at 75% so teams can investigate before hitting the cap.
2. Use native Snowflake views for cost tracking
Snowflake’s ACCOUNT_USAGE views provide self-service cost monitoring: WAREHOUSE_METERING_HISTORY for credit consumption by warehouse and hour, STORAGE_USAGE for daily storage volume, and QUERY_HISTORY for execution time, bytes scanned, and warehouse used per query.
These views give you the raw data on credit consumption, storage volume, and query performance. For integrating that data to business outcomes, cost per customer, team, feature, model or AI inference, see the CloudZero section below.
Snowflake Cost Optimization Cheat Sheet
|
Strategy |
Effort |
Typical savings |
Who owns it |
|
Auto-suspend to 60s |
5 min per warehouse |
10–30% of idle compute |
Data engineer |
|
Right-size warehouses |
1–2 hours A/B testing |
15–40% per warehouse |
Data engineer |
|
Separate warehouses by workload |
Half-day refactor |
Enables attribution (savings vary) |
Platform team |
|
Result caching (avoid CURRENT_TIMESTAMP) |
Code review pass |
5–20% for BI workloads |
Analytics engineer |
|
Query timeouts |
5 min per warehouse |
Prevents runaway queries (risk reduction) |
Data engineer |
|
Drop unused tables |
1-hour audit |
10–50% of storage costs |
Data engineer |
|
Transient tables for staging |
Per-table decision |
Eliminates Fail-safe storage overhead |
Data engineer |
|
Tune Time Travel retention |
Per-table decision |
5–15% of storage costs |
Data engineer |
|
Resource monitors |
30-min setup |
Prevents budget overruns (guardrail) |
FinOps / platform |
What Are The Best Snowflake Cost Optimization Tools?
Snowflake cost optimization tools range from native monitoring to purpose-built platforms. The right choice depends on what you need to solve.
See our guides to the best Snowflake monitoring tools and Snowflake tools for storage and usage.
Frequently Asked Questions About Snowflake Cost Optimization?
How Does CloudZero Connect Snowflake Costs To Business Outcomes?
Most Snowflake cost reduction advice stops at warehouse tuning and query cleanup. Those are necessary, but they only address the technical layer.
The harder question, and the one that matters to engineering and finance leadership is: what is our Snowflake spend actually buying us?
This is the gap between cost monitoring and cost intelligence.
Snowflake’s native tools show total credit consumption by warehouse. They cannot connect that consumption to the products, customers, teams, or features driving it. Without that context, you are optimizing blind.
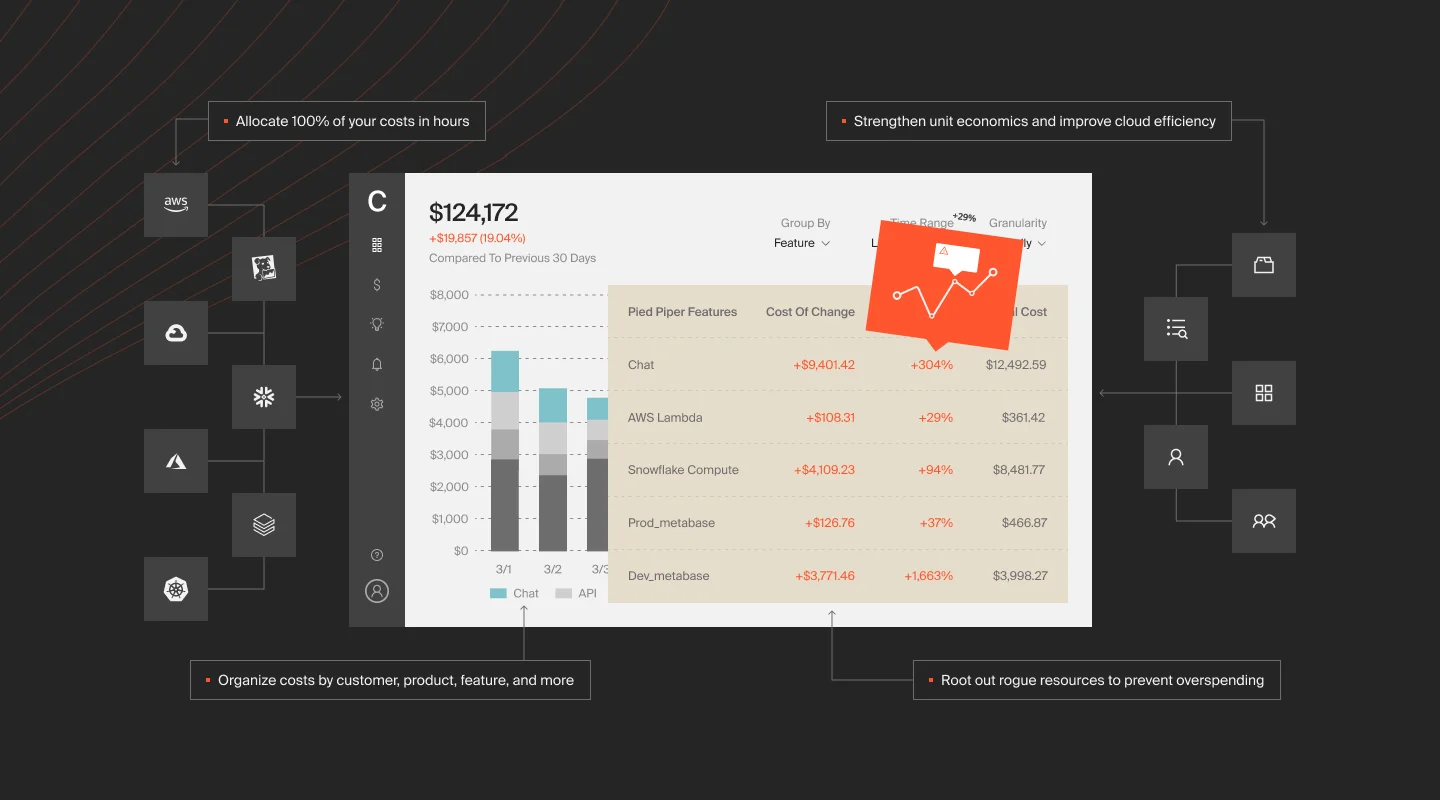
CloudZero integrates directly with Snowflake and allocates 100% of your Snowflake costs without relying on tags. Using CloudZero’s CostFormation engine, the platform maps credit consumption to business dimensions: cost per customer, cost per product, cost per feature. This is the unit economics layer that turns raw spend data into decisions about pricing, architecture, and investment.
What this looks like in practice:
- Anomaly detection. CloudZero flags unusual Snowflake spend spikes and routes real-time alerts to the engineers who own the affected infrastructure, via Slack, not a dashboard they will never check.
- Multi-cloud consolidation. Snowflake costs rarely exist in isolation. CloudZero brings Snowflake, AWS, Azure, GCP, Kubernetes, Datadog, and other platform costs into a single view, so you see total cost of ownership across your entire stack.
- Actionable optimization. CloudZero Optimize delivers prioritized, context-rich savings opportunities directly into Jira and Slack. Engineers see what to fix, why it matters, and how much it saves, without switching tools.
The question is not just “how do we reduce Snowflake costs?” It is “are we getting value from what we spend?” That is the difference between cost management and cost optimization, and it is where CloudZero operates.
Want full visibility into your Snowflake costs, down to the customer, team, and feature level? CloudZero integrates directly with Snowflake and consolidates your data warehouse spend with AWS, Azure, GCP, and Kubernetes costs in one platform. Take a product tour,  , or explore the Snowflake integration.