The world of cloud costs is always evolving, and AI spend is quickly becoming one of the most unpredictable and confusing cost drivers. As more organizations integrate generative AI into their products, FinOps teams are struggling to account for — and control — these new, often mind-boggling cost streams.
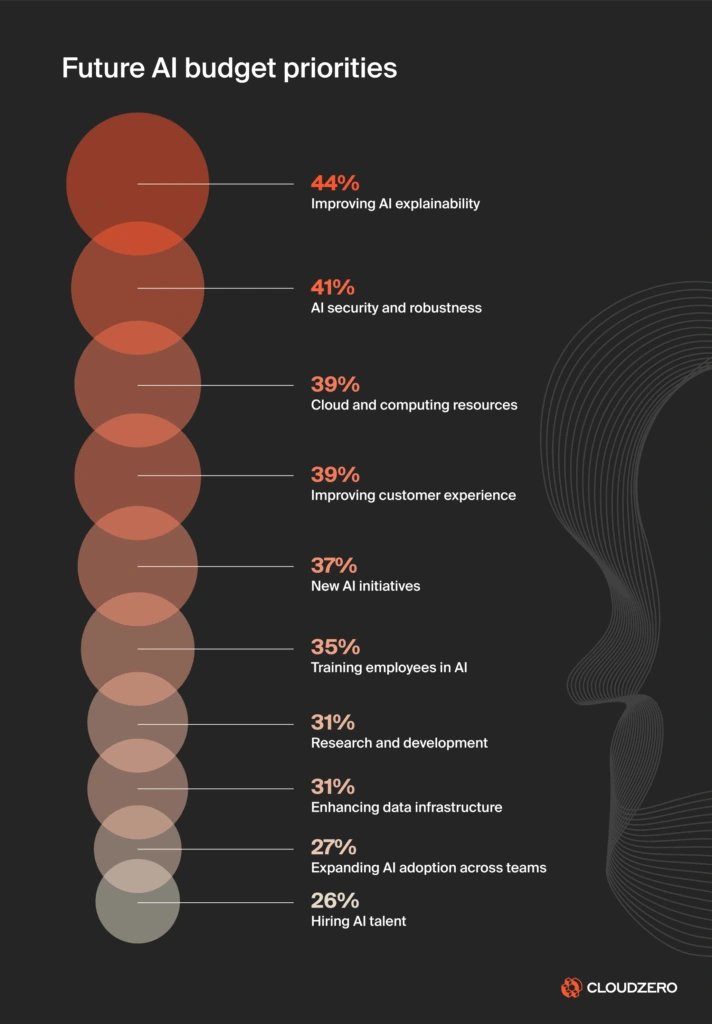
In fact, 44% of engineering professionals say improving AI explainability is a top priority in AI budgeting, according to CloudZero’s State Of AI Costs In 2025 report.
Your team doesn’t have to endure that. You can turn things around with an effective AI tagging strategy — one that will help you take that crucial first step toward understanding your AI unit costs.
Below is a practical approach to tagging AI costs, from inputs and outputs to training stages and even hallucination mitigation, even if you’re just starting to crawl.
Your Practical Guide To Tagging AI Spend
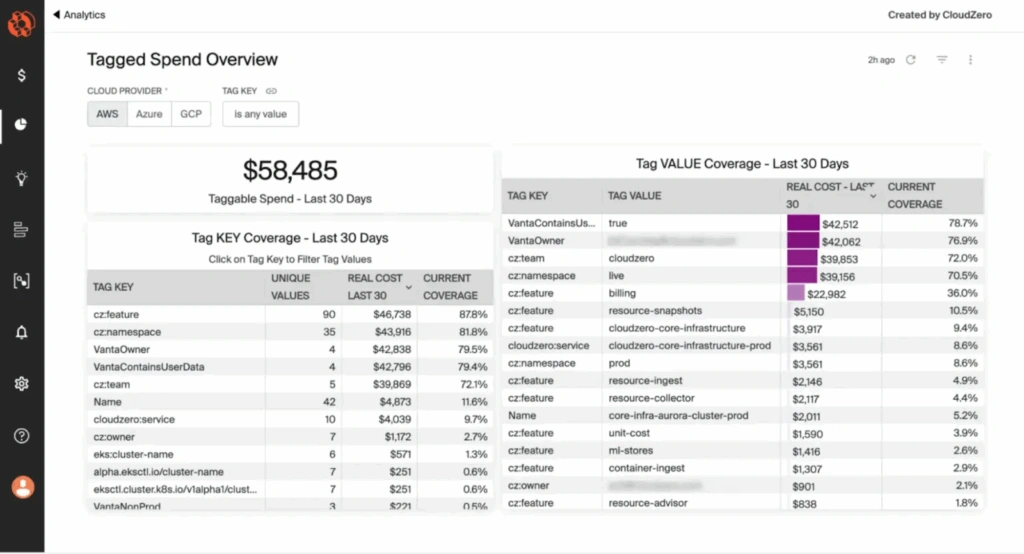
Typically, an AI invoice might show you GPU types, total spend, or basic input/output charges (i.e., $0.10 per input). You might see model names like ChatGPT or Claude depending on what you use.
Beyond these high-level metrics, however, cloud bills won’t show you where your money is truly going.
Imagine you’ve used one large instance to house all your AI work up to this point. While it’s good to know your total AI costs, our next goal is to figure out which specific project, workload, or features are driving that cost.
This strategy will give you the granular visibility you need to make strong business decisions.
Your AI tag governance framework
With this approach, you’ll break your bill down into manageable chunks, creating visibility into your AI spend by tagging each resource’s purpose so you understand how it’s being used.
Ultimately, this approach breaks each bill down into itemized chunks that you can use as a basis for optimization and for making smarter build choices in the future.
Read more: Learn how our in-house FinOps expert Thalia Elie optimizes AI costs for customers without slowing them down.
You can jump in wherever it makes the most sense to you. If you’re new to tagging or your existing tags are disorganized, we recommend moving forward in this order of priority:
1. Tag projects
Start by labeling your resources by project. This immediately helps you know how much every individual project contributes to your expenses.
2. Tag training stages
Think of AI models as computers that are constantly in training. Understanding their training stage is critical:
- Are they in basic training? If so, they may not know much and will likely incur high costs as you feed them massive data sets.
- Are they in inference? These models may take some prompts and cost a little less.
- Are they being fine-tuned? If you’re just tightening things up, your costs should be lower than models requiring a lot more training.
This insight shows you what spend levels you should expect for different stages.
You’ll also have the information you need to notice if costs are unexpectedly high. For instance: “Project B is being fine-tuned but it still costs a lot. We should look into that.”
3. Tag features/functions
Beyond the training stage, what is the AI model doing?
The answer to this question is its feature or function. For example, Project A might be a chatbot, and Project B could be a recommendation tool.
Tagging by feature lets you track spend for specific functionalities over time. You can then know exactly what resources are required to create a chatbot, for instance, and how much it costs to maintain the chatbot. This will make it much easier to build future cost projections and compare costs across projects.
4. Tag successful outputs
This tag is a game-changer because it can help you measure the real value of your project and prevent hallucinations.
Standard input/output tags only show the amount of money spent on prompts and responses.
By adding a “successful outputs” tag (or even “unsuccessful outputs”), you can identify when an API request comes back unsuccessful or when a chatbot receives “thumbs down” feedback from users. This lets you know when your AI is hallucinating and costing you money without providing value.
If Project C’s chatbot is hallucinating and costing money for unsuccessful results and project A’s chatbot costs a little more but never fails, you’ll have a clear-cut picture of where to reinvest your money and effort to achieve true efficiency.
5. Tag everything!
You can come up with tags to suit any way you’d like to slice up your costs into smaller chunks. The more detailed, the better!
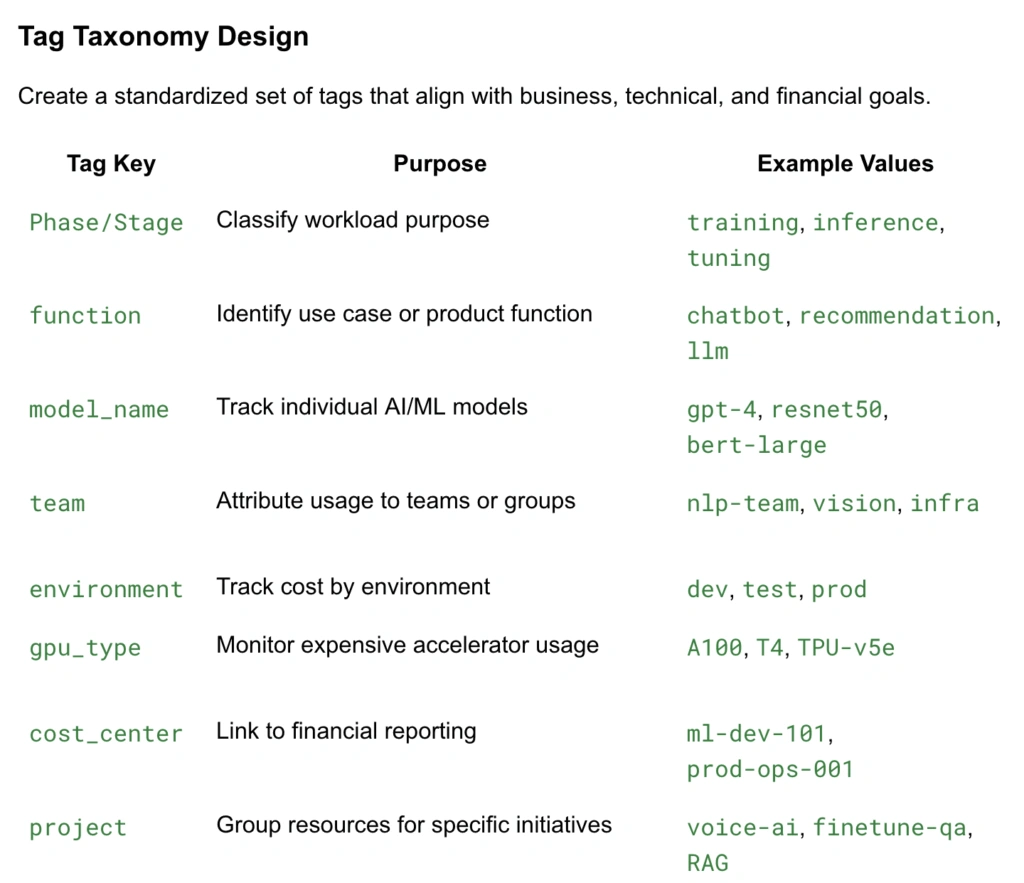
Below is the tagging strategy we typically recommend at CloudZero, but you can modify this as you see fit.
Gain control with AI unit cost metrics
The above framework might fundamentally change how you approach AI unit costs, but don’t be intimidated. By breaking down spend beyond simple input/output, you gain real control, visibility, and accountability into costs.
If there’s one takeaway from this tutorial, it’s this: The ‘successful output’ tag will truly transform your unit cost tracking capabilities. You can use this tag to quantify the cost of inefficiency due to hallucinations or failed processes.
In turn, this data allows teams to make crucial tradeoffs: Is a more expensive output worth the improvement in quality and reliability?
With unit cost data in hand, you can answer this question confidently.
Report
Finance needs to prove AI’s return: CloudZero report
260 senior finance leaders (more than half CFOs) told us why the speed of seeing AI spend, not the size of it, separates who pulls ahead on AI from who gets burned.
Implementing Your AI Tagging Strategy: Crawl-Walk-Run
CloudZero FinOps Account Manager Thalia Elie likes to tell clients, “You don’t need perfect visibility to start getting value from AI cost tracking. But you do need to start.”
“You don’t need perfect visibility to start getting value from AI cost tracking. But you do need to start.”
In other words, if you haven’t started on this journey, that’s fine. Every journey starts with an initial step, and that’s no different when it comes to tagging and tracking AI spend. Following the FinOps crawl-walk-run framework is a good path.
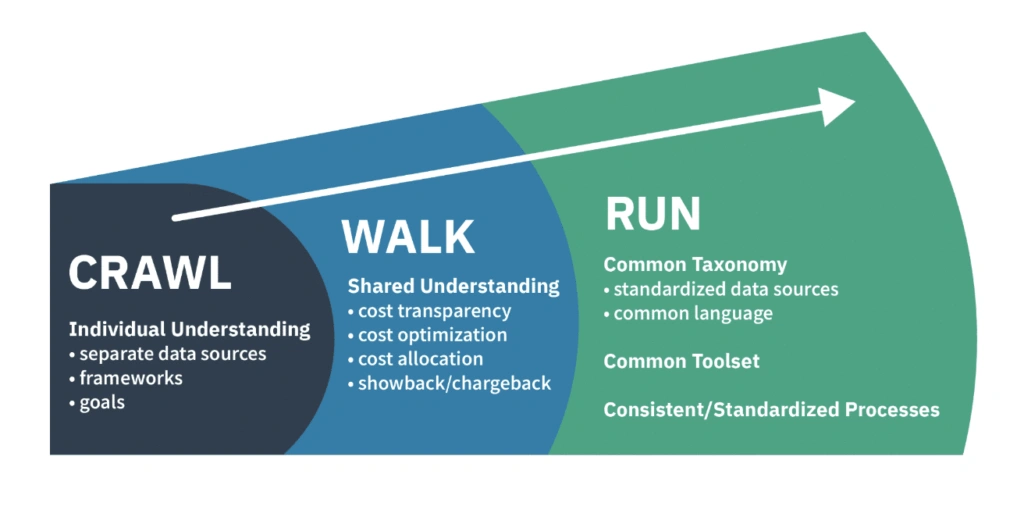
The crawl stage
In this initial phase, you’re setting a foundation. The goal is to start the conversation with your team about tagging AI expenses and deciding which tags are relevant to you.
You’ll want to identify the tags that matter in your situation and decide on a naming convention. Try to make it clear and consistent. We recommend using lowercase and dashes to keep everyone on the same page and avoid confusion — something like this:
project-a-chatbot-inferenceThe walk stage
Once you’ve defined your tags and naming conventions, it’s time to automate. You can empower your engineers to implement these tags by writing scripts. For instance: “Whenever this resource gets spun up, stick these tags on it.” This takes a lot of the tagging workload off your engineers and ensures consistency.
As tags are applied, you can use your CloudZero dashboard to track the tags and monitor how your FinOps AI strategy is progressing.
The run stage
When you’re in the “Run” stage, you’re a well-oiled machine. Everyone knows what they’re doing, everybody’s got a job, and no one is messing up tags or forgetting to tag.
In other words, most of your spend is now trackable. You’ve got about 90%+ of your tags implemented and that gives you a clear pane of visibility into your spend.
Now it’s time to start using that information to make decisions.
Now’s the time toThink about setting up alerts on your spend, asking teams to pivot away from inefficient spending tactics, and sparking some focused conversations about how to keep improving. This continuous improvement should become an ongoing trend; you’ll want to regularly audit and update your tags to reflect new names or changing needs.
Time To Start Tagging And Tracking
Remember, you’re not aiming for perfect visibility from day one. You’re working toward your first crawl. Just start moving.
All this effort gets you closer to where you need to be. Empowering your teams to be more efficient, make smarter decisions, and ultimately get the most value from your AI investments.
Every journey begins with that first step. And you’re progressing with every step you take. Ready to start? Schedule a demo with CloudZero here.