We see it often. Too many companies struggle to optimize their cloud costs — whichever platform they use, from Microsoft Azure to Amazon Web Services (AWS) and Google Cloud Platform (GCP).
So, in this guide, we are sharing over 20 Azure cost optimization best practices you can apply right away — all in a calorie-free, snackable guide you can read in less than a coffee break.
Before we start, remember this:
Cost optimization is not just about reducing your cloud costs; it is also about understanding what tradeoffs to make, what to prioritize, and even where you can invest more to maximize your returns (ROI). More on that later.
1. Aim For Automated, End-To-End Azure Cost Visibility
Cloud-native technologies, including microservices and containers, and highly scalable platforms, like Kubernetes, can cause cost monitoring blindspots due to their complexity.
One way to outmaneuver this is to perform full-stack cost monitoring. You can do this by capturing as much data from as many of your infrastructure components as possible. You’ll often require a cost optimization tool to automate, scale, and report on this cost data.
There are several in-built tools in Microsoft’s Azure cloud to help you do that, including:
- Azure Application Insights – It detects and analyzes incidents across applications and their dependencies.
- Azure VM insights and Container insights – They provide insight into infrastructure issues through metrics and logs.
- Azure Log Analytics – This tool gets you deeper insights from your log data to troubleshoot issues faster.
- Automated actions – It helps you run cloud and on-premises operations at scale with minimal manual intervention.
- Azure dashboards and workbooks – These enable you to visualize the health of your infrastructure, apps, and networking components within a single platform for a more comprehensive analysis.
- Azure Monitor Metrics – It gathers and analyzes metrics data from various Azure resources, including Azure Cosmos DB Insights, Azure Backup, and Azure IoT Edge.
- Change Analysis – It helps you assess data on occurring changes to support ongoing monitoring or incident management.
These Azure native tools will help you get started with Azure cost monitoring. With time, you may need a more robust solution to capture more accurate, actionable data at scale. In that case, here are 15 top Azure cost management tools to consider.
2. Apply Continuous Azure Cost Monitoring And Optimization
After setting up your Azure cost monitoring, you’ll want to keep it running continuously. Your Azure cloud is dynamic, so your resource utilization and related costs are constantly changing.
Continuous monitoring helps you detect cost anomalies in real-time, preventing potential issues from becoming expensive problems. In addition, it helps you quickly identify the root cause of the cost anomaly, enabling you to fix the issue and prevent future budget overruns.
3. Automate Azure Cloud Cost Management
Trying to capture Azure cost data with spreadsheets is often too time-consuming and frustrating for many FinOps teams. Furthermore, for continuous cost management in Azure, you need cloud cost optimization tools that automate the aggregation, analysis, and reporting processes.
Tip: Check out the tools discussed in the previous best practice. Be sure to use a robust solution, so you don’t have to rely on several Azure cost optimization tools at once.
4. Really Understand Your Azure Cloud Costs
Here’s the thing. Most cloud cost management tools do just that; they aggregate, visualize, and report costs. They show total costs and averages, making it difficult for 7 out of 10 organizations to know exactly where their Azure spend is going.
In addition, simply knowing their Azure costs went up the previous month tempts them to indiscriminately lower their Azure spending the following month rather than optimize it. Here’s the difference.
Rather than looking at average costs, you want to see the cost per unit. Think; how much you spent on each customer, not just how much it cost you to serve your entire customer base on average. Like this:
This unit economics approach can help you gather actionable insights, such as:
- How much you need to charge for your services to earn a healthy margin
- Which customers to move to a different pricing tier
- Which customer segments are the most profitable (so you can focus more on attracting those segments)
- Forecast how much your costs will change if you onboard more similar customers
- Where you can cut costs without adversely impacting your Service Level Agreements (SLAs)
This granularity can also apply to other business dimensions you have, including cost per product, software feature, service, team, project, environment, deployment, etc.
5. Tag Your Azure Resources
Azure allows you to identify your resources in production using plain text key-value pairs. You set these tags according to your organization’s needs.
For example, you can track your resources through a deployment environment by adding a key titled Environment. If you want to describe the resources you deploy to production, you can label them with a value like Production. Together, the key-value pair translates to Environment = Production, an identifier that will appear in your Azure resource utilization and cost reports.
We get it. Tagging can be so much work; so much so that the latest State of the Cloud Cost Intelligence Report found that only 13% of companies had allocated at least 75% of their cloud costs.
Yet, tagging can drastically improve your ability to see which resources are consuming your Azure budget, enabling you to do something about it. Fortunately, some cost optimization tools do not require you to have perfect tags in order to generate accurate cost allocation data for you.
6. Align Your VMs Start/Stop Schedule With Actual Usage
Many companies do not operate significant workloads during the night and on weekends. Turning on your virtual machines only when you need them is one of the best ways to save money. Here’s the next step.
7. Shut Down Idle Or Unused Resources
Your next step is to optimize your resource use and costs when your virtual machines are running. Azure Virtual Machine Automatic Shutdown helps you minimize operating costs by automatically shutting down idle or unused virtual machines after they sit idle for a specified period.
8. Set Up VM Autoscaling
Autoscaling refers to setting up rules that define how your Azure VM’s compute, memory, network, and storage capacities continuously increase or decrease to your workload’s changing requirements.
Aside from improving performance, Azure Autoscale also reduces costs. It reduces operating costs by terminating redundant VMs once peak performance is no longer needed.
9. Rightsize Underutilized Resources
Teams used to configure the highest performing VMs in case they needed more power in the future. That’s no longer necessary. Today, a few clicks are all it takes to increase or decrease the amount of capacity you need to run your application smoothly in the cloud. There are no long-term commitments or provisioning requirements.
Rightsizing your Azure VMs starts with choosing the right Azure Virtual Machine types for your workload. Here’s a quick guide to the different VMs and when to use them:
- General Purpose Azure VMs – A, B, and D Azure VM series are suitable for testing, small to medium development environments, small and mid-size databases, and servers with low-to-moderate traffic.
- Compute Optimized Azure VMs – F-Series Azure VM types deliver a high CPU-to-memory ratio, and suit web servers with medium traffic, batch processes, and mid-size business apps.
- High Performance Compute Azure VMs – H-Series types offer the highest compute setup to power demanding workloads, such as financial analysis and simulations.
- Memory Optimized Azure VMs – E, M, Mv, and D VM series provide a high memory-to-CPU ratio to support memory-intensive work, including relational database servers, in-memory analytics, and mid-size to large caches.
- Storage Optimized Azure VMs – Ls VMs cater to big data processes, such as running data warehouses (SQL, NoSQL, etc).
- GPU Optimized VMs – These N-series VM types deliver the power to render graphics-intensive workloads, like video editing, graphics rendering, modeling, and deep learning.
From there, you can continuously tweak your Azure VM type configuration based on your daily operations and the feedback you receive.
10. Understand Your Options And Tradeoffs
There’s a good correlation between this Azure cost optimization best practice and the previous one about understanding your Azure cloud costs granularly. When you understand where your Azure spend goes, it’s much easier to pinpoint modifications you need to make to optimize your returns or cut costs.
For example, once you find out how much a particular product or software feature costs, you can decide to:
- Remove it from the free tier if its cost is unsustainable
- Feature it as a paid service
- Convert the free forever tier to a 14- or 30-day free trial (with a money-back guarantee, perhaps) to prevent overspending
- Analyze its popularity in relation to its costs and decide whether to keep it, decommission it, or refactor it for a different use case.
Knowing these options gives you the data-backed insight you need to position yourself advantageously in your market.
11. Switch To Azure Elastic Databases
With elastic pools, you can achieve high performance at a great discount if you configure them properly. Azure SQL Database Elastic Pools enable you to pool resources together and then share them across multiple database workloads.
Instead of allocating separate resources to cater to the fluctuating usage requirements of each database, this resource pool allocates resources to the different databases. Ideally, the peak workloads should occur at different times across the multiple databases to make this viable.
12. Make The Most Of Storage Tiering In Azure
Storage tiering in Azure is a storage pricing strategy based on how frequently or infrequently you access and tweak the data you keep. The less often you need to modify or access it, the greater your savings. Azure Blob Storage provides Hot, Cool, and Archive storage tiers with several redundancy options (lower redundancy means lower storage costs).
To optimize costs, move less sensitive or less-frequently accessed data to a lower-cost tier or to a lower-redundancy option. Better yet, you can configure your setup to automatically move old data to lower-cost storage options.
13. Take Advantage Of Azure Hybrid Benefit
Using Azure Hybrid Benefit enables you to use your existing licenses for your on-premises (Software Assurance-enabled) SQL Server and Windows Server licenses on the Azure cloud. RedHat and SUSE Linux subscriptions are also eligible for the licensing benefit.
The offer lets you do more with your license without incurring additional charges, maximizing your returns. You can get up to 40% off Azure Virtual Machines (IaaS) and up to 55% on Azure SQL Database (PaaS) as well as SQL Server.
Better yet, you can combine Azure Hybrid Benefits with Azure Savings Plans or Reserved Instances to get up to 80% discounts.
14. Use Azure Advisor
Azure Advisor evaluates your resource settings and usage metrics, logs, and traces and uses that data to recommend how you can improve cost savings, performance, reliability, and security. The tool’s dashboard presents customized recommendations across all of your subscriptions.
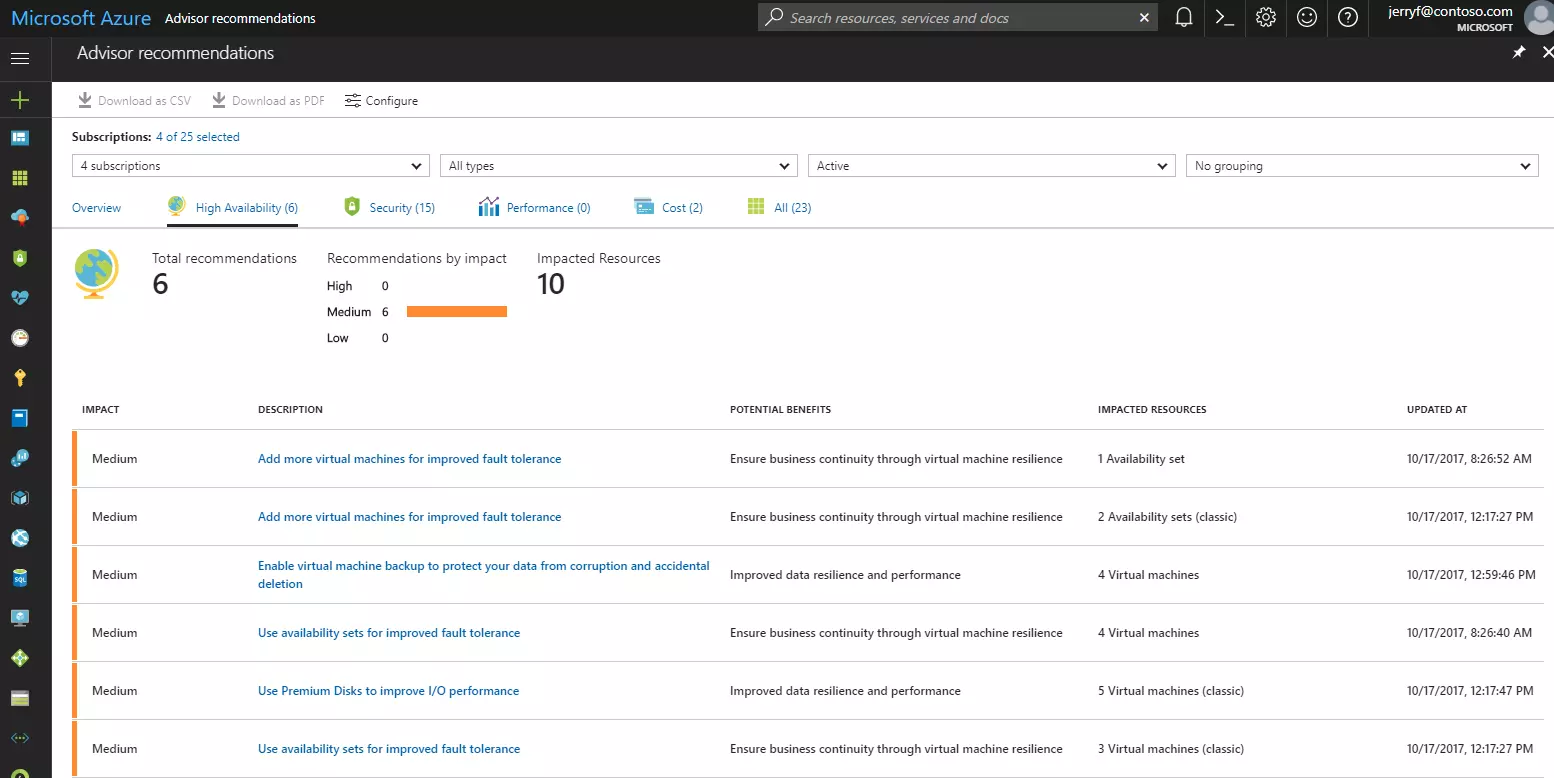
Azure Advisor recommendations dashboard
You can also filter recommendations by subscription and resource type so you can implement specific cost optimization strategies in Azure.
15. Take Advantage Of Azure Reservations
Azure’s Reserved Virtual Machine Instances (RVMIs) deliver up to 72% discount off pay-as-you-go pricing as long as you reserve the capacity for one to three years in advance.
Azure RIs apply to a variety of services, including App Service, Azure Cosmos DB, Azure Storage Reserved Capacity, Azure SQL Database, Azure Synapse Analytics.
With this option, you can pay all upfront or monthly (which reduces your upfront cash outlay). Combining RVMIs with Azure Hybrid Benefits can also save you up to 80% off the standard (uncommitted) price.
16. Leverage Azure Spot Virtual Machines
Spot VMs provide discounts of up to 90% off pay-as-you-go rates for spare Azure compute capacity, similar to AWS Spot Instances. Whenever Azure requires that capacity back for whatever reason, it will give you a 30-second notice to switch from Spot VMs to pay-as-you-go instances.
However, you can still use Azure Spot VMs for a wide range of temporary tasks, including batch jobs, rendering, development/testing, and advanced analytics.
17. Use Azure Dev-Test Pricing
You can take advantage of Azure’s ongoing development/testing pricing plan if you are a Visual Studio customer — up to 65% off, depending on the service you choose.
You get dev/test discounts when using Windows and Windows Server VMs, Azure Cloud Services instances, Azure App Service, Azure SQL Database, Azure HDInsight instances, and Azure Logic Apps.
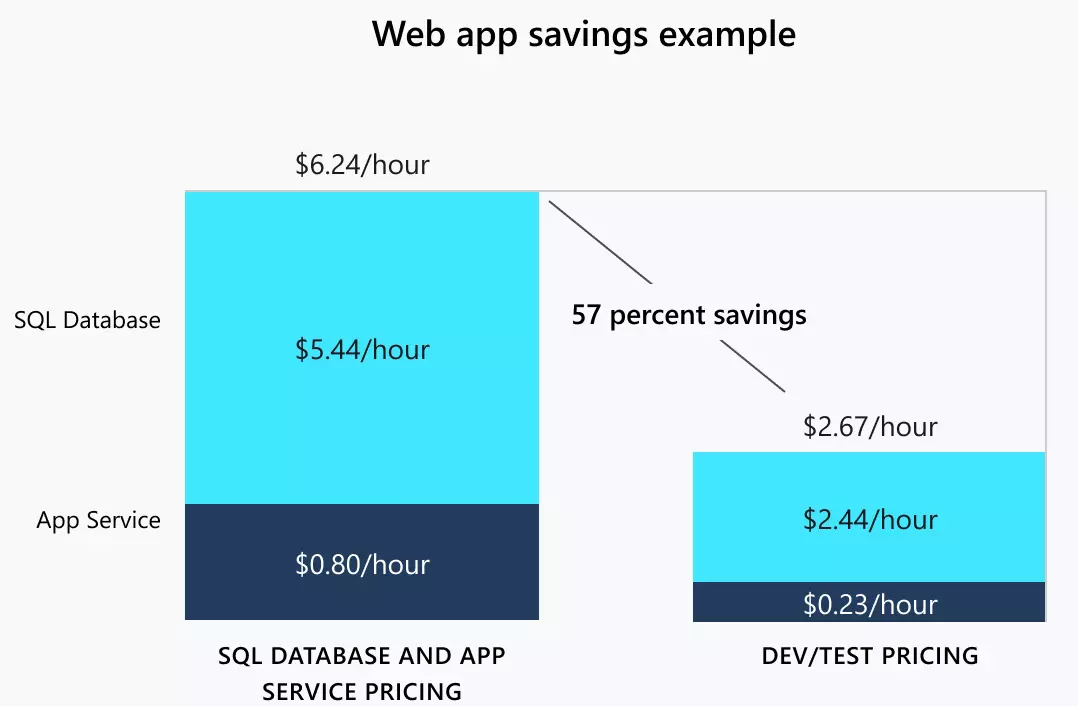
Credit: Azure
The offer also lets you use purpose-built dev-test services on Azure DevTest Labs, Azure shared image gallery, and Windows Virtual Desktop.
18. Reduce Azure Costs With Savings Plans For Compute
Azure Savings Plans enable you to commit to a fixed hourly rate on compute services for one or three years — and get up to 65% off pay-as-you-go prices. In addition, Savings Plans apply across instance types, operating systems, and regions. You can also use them in combination with Azure Hybrid Benefits to realize even more savings.
The longer you commit, the higher the potential savings. However, if you use more capacity than the plan allows per hour, the service will bill the additional amount separately and at pay-as-you-go prices.
You can either purchase a savings plan or trade in one or more active reservations for one. Azure cancels any reservation that you trade in for a savings plan.
19. Use Azure Price Matching
If you choose, Azure offers to price-match to similar Amazon services within 90 days of your application.
Specifically, it provides price matching for Amazon EC2 (compare to Azure Linux VMs), Amazon S3 Standard (versus Azure Block Blob Storage ZRS Hot), AWS Lambda (to Azure Functions), and Amazon S3 Standard Infrequent Access (against Azure Block Blob Storage ZRS Cool).
20. Profit from Differences in Azure Regional Pricing
You can enjoy significant discounts when you run workloads in a particular Azure region within the same geographical area.
For example, running a DS2 v2 instance in East US 2 costs $0.114 per hour on a pay-as-you-go plan. That gets you a 22% discount per hour over using the same instance, workload, and pricing plan in the East US region. If a switch is possible, you’d save a lot on each monthly bill.
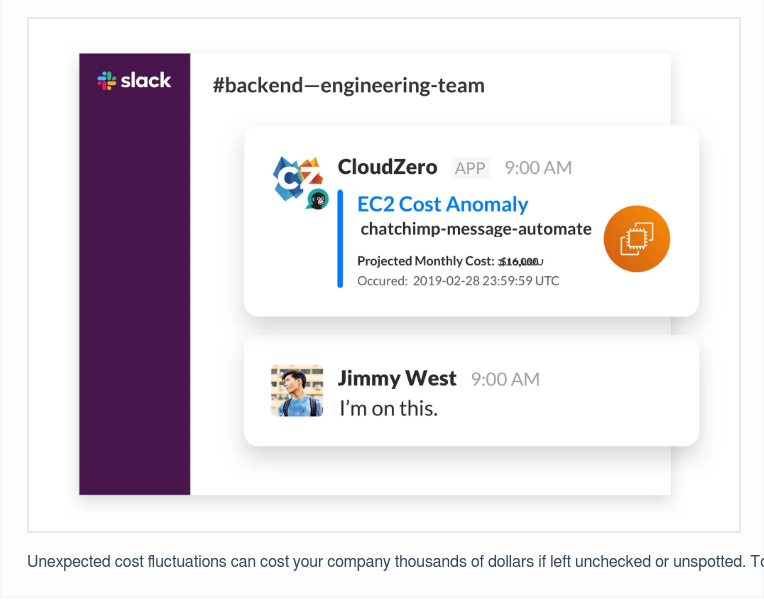
21. Use Real-Time Cost Anomaly Detection and Alerts
Our best example comes from our customer, Starchive. The team used cost anomaly detection to discover their cloud costs were up 1,600%. Had there been no cost anomaly detection and alerting system in place, this would have blown a hole in their cloud budget.
A real-time cost anomaly detection tool can help you detect potential problems before they become costly failures.
Azure’s Anomaly Detector offers near real-time univariate (up to 20,000 transactions per month free) or multivariate detection ($0.314 per 1,000 transactions). CloudZero provides live feedback so you can react immediately — at no additional cost.
22. Control Costs With Azure Policy
The Azure Policy platform provides a single location for setting and enforcing guardrails across several areas, including Azure resource governance. Aside from automating policy assessments and enforcing them in real-time, Azure Policy also automates resource remediation at scale.
23. Accurately Allocate Azure Costs To Business Metrics You Care About
Ultimately, you want to understand Azure costs in relation to your business. You want to understand who, what, and why your Azure costs are changing. The more you know about the people, processes, and products that drive your spend, the easier it will be to pinpoint where you can reduce your Azure cloud costs.
Likewise, you can tell where exactly to increase your investment to maximize your returns. The way to achieve this is to use unit costs instead of averages and totals.
Take these four examples:
- Analyzing your cost per customer can help your marketing team determine which customer segments have the highest gross margins. Then you can focus your customer acquisition campaigns on attracting more of these types of customers.
- Using unit costs, your finance team can calculate how much to profitably charge a specific customer or for a service, project type, product, etc.
- You can protect your margins by analyzing your cost per feature and retiring or raising prices on costly features.
- Understanding your cost of goods sold (COGS) allows management to predict how your costs will change as your business grows and prepare in advance to maximize economies of scale.
You can do all of this and more with CloudZero.
Beyond real-time cost anomaly detection, CloudZero also provides smart alarms to reduce alert noise. Budgeting and forecasting tools are also available. CloudZero AnyCost also allows you to combine costs from Kubernetes, AWS, GCP, and software vendors like New Relic and Snowflake in one place for efficient cost analysis.
But don’t just take our word for it.  and see CloudZero in action!
